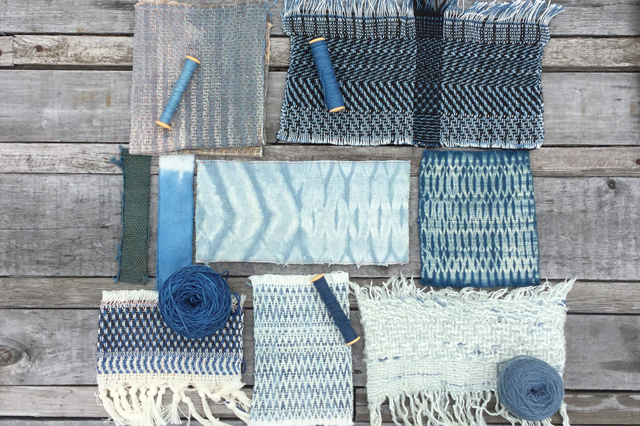
My first experiences with indigo that peaked my interest were a bit how I imagine Oz seems to look from the outside. Beautiful. Idyllic. Carefree. I started by taking a few classes in beautiful Brooklyn loft spaces and community gardens with perfect vats and vivid blue results. Once I began my own trials, however, it was much more like going behind the scenes and meeting the Wizard behind it all. My false sense of indigo-security was evident from my first vat experiment.
I decided to start with a dye recipe from one of the workshops I took, which contained vague details at best. But if it worked for them, why shouldn’t it work for me?! Oh! how wrong I was. I started by dyeing my first shibori tester that I’m still afraid to wash in case the color rinses out. This very pale blue was enough to move forward with my weaving project and I left with a sense that, “I know nothing, Krista Snow.”


After Try #1, I ventured to seek out instructions from a well-known indigo master, Michel Garcia. I read several articles online on how to use his vats, and chose to try the fructose fermentation vat again but with his instruction this time. Slightly more details but evermore questions on my end. I realized I was beginning to think like a scientist in my approach and no amount of online searching would satisfy my quest for knowledge. For some reason, this vat was also a bust. I started wondering if the indigo I bought was the problem, if my water source was corrupt, if my yarns weren’t scoured enough, if I was too impatient with dipping, if too much air got into the vat, etc. Endless wonderings on my part. I had dyed the yarn for my Cosmonaut scarves, which is the reason it’s an indigo hit-and-miss. It looked beautiful as yarn (though a bit more steel blue), which promptly washed down the drain during processing. At this point, my indigo obsession was in for the slow-burning long haul. I tried an iron vat and still received the same dull, washed-out blue. Every defeat put me off trying for another 2 months…when in reality, those vats might have been good in a few days had I known how to deal with them.

At some point, I was sick of the buckets of failed dye taunting me in the studio and ordered the “Natural Dye Workshop with Michel Garcia” dvd. I started a new vat with a gallon of spring water, used henna instead of fructose and followed his instructions explicitly. This means I re-watched his indigo segment 5 times before even taking notes. I realized it’s only since things have gone wrong that I’m hyper-attentive to the process now. With my first attempt at the henna vat came that beautiful green-to-blue oxidation that is so captivating. Also, a lot of screaming could be heard from my apartment. I, of course, didn’t believe I succeeded until after I tried washing it all out. I’d finally got it!! Since then, I’ve reused the same vat for at least 5 months and revived it last week. I’ve stopped praying and crossing my fingers when I heat it up again. This is huge.

Now from my year + of experience and heartache, here is what I have to share about indigo dyeing:
With Michel Garcia’s 1-2-3 henna vat recipe, you’ll use 1 part indigo, 2 parts lime, and 3 parts henna. For me, I like a dark vat so I use 50g indigo, 100g lime, and 150g henna (generally a “brown” shade though this doesn’t matter).
Basic instructions and my notes:
- Add indigo to a small jar with a handful of marbles. Add enough boiling water to cover indigo. Shake for 2 minutes. Indigo must be crushed before entering the vat.
- Add henna to a larger jar and mix with enough boiling water that it becomes the consistency of split pea soup. Work out those clumps!
- You can work a few different ways. You can either do a small jar with all of the vat-goodness and later transfer to a pot to dip, or you can start in the pot you later dip in. I choose the all-in-one pot.
- Add a decent amount of water to your dye pot, maybe a gallon or less. This is where I use bottled water in case my tap water is working against me.
- Add the boiling water/henna soup to the pot. Rinse out the extra henna into the pot.
- Shake the indigo/boiling water combo a few more times before adding to the pot. Rinse out extra indigo into the pot, don’t waste it!
- Add the lime. Stir gently, add as much water as you need to dip your yarn/whatever.
- Wait either 15 minutes or the next day. As painful as it is, I wait until the next day.
- The materials you dip should be scoured to remove grease/dirt/etc. and to dye an even shade. If you don’t care about that, dip away! Your items should be wrung-out but damp (not dry) before dipping.
- Have a bowl of cold water sitting next to your vat. Once you take items out, you’ll want them oxidized and cold water is the perfect step between the vat and rinsing.
- Hold items in the vat anywhere from 30 seconds to a few minutes, depending on depth of shade desired, then squeeze as much indigo out as you can before removing. Put in bowl of cold water and/or watch that color change! It might look really dirty so rinsing in cold water will bring out the cleaner, brighter blue. Rinse until water is clear. Pat yourself on the back.
- If you use the vat the next day, just stir first, wait 15 minutes for it to settle, check the pH. It should be in the 10-12 range for cotton (sources I’ve read have varied on the pH). You can dip it cold or warm, but I try to recreate the initial vat situation (boiling water warmth). I put the vat on medium for 30-40 minutes and if it’s comfortable for my gloved hands to be in it, it’s perfect. Too hot is not beneficial and will potentially shock your fibers and burn your hands. I’ve read it shouldn’t go over 120 degrees, some people say less than that. I’ve ruined several vats (I’m sure) by having them too hot.

Tips:
- Whenever you add henna (to lower the pH), always mix it with boiling water to create a henna soup before adding to your vat. Never put dry henna straight into the vat.
- Always do a tester first. It could be a little bundle of yarn, piece of fabric, etc…but it should be wet beforehand. You’ll see the quantity of indigo left in the vat pretty quickly with a tester. If it’s in there for 1 minute and is very pale blue, it may be time to revamp it unless you like it pale.
- In several vats I’ve done (even slightly successful ones), I haven’t had much of a “flower.” I’ve had no problem with this in the henna vat, but I suspect it might have to do with adding things/adding air to the vat. Just a theory.
- If you are troubleshooting, be very careful with adding lime. A little goes a long way!
Reviving a vat:
- Start with the cold vat. Stir the vat gently. Wait about 15 minutes for it to settle. Check the ph, the normal range for dying cotton is between 10-12. If it’s too high (above 12), it is too acidic and you will need to add more henna. Do this by mixing henna with boiling water before adding to your main vat as it must be activated first. Add the soupy henna mixture to your vat. Stir. Wait until the next day. Stir. Wait 15 minutes for it to settle. Check the ph again. Note: The amount of henna added will depend on the strength of your vat, size, etc. With mine, I usually add about 3-4 tablespoons of henna mixed with enough boiling water that it’s like split pea soup.
In conclusion, my adventures in indigo have really just begun! I hope you all try it out and get your hands dirty with blue! If you have any questions or indigo-related toddler-like fits to share, please do so as I love troubleshooting and sympathizing with members of the Blue Hand Society.

Hi, I just did and indigo webinar and am going to set up a vat and wanted to ask a couple of things. I have pre-reduced indigo powder so would the quantities be the same and can I omit the marbles?
LikeLike
Hi Carol Anne,
I haven’t used pre-reduced indigo, are you thinking of using it with the 1-2-3 method? I thought it was a whole other type of vat for that, but I could be wrong!
LikeLike
I too was having problems in the past but thought I’d give it another go, yes I bought the DVD’s as well, last night set up 4 gallon jars with 4 different ratios. 10, 20, 30 and 40 of indigo with the appropriate 1, 2, 3 of the lime and fructose. My first two samples went so well and the color so wonderful I was shocked. But this morning in 2 jars it looks like brown and tan sludge sitting inside the glass jars. Being glass I can see the layers. Only 2 have a flower and the other too are coppery – which is good I guess. Anyway yes I am getting to my comment – thank you for telling me to stir and let sit for a bit. I am going to try 4 samples this morning without stirring, then stirring to see what happens. Thank you for sharing. And no, I have no intention of heating them up.
Science is what turns me on – not this guessing stuff. I am taking a shibori/indigo class for 12 days in Japan this summer but wanted to get a head start on what can go wrong so I will have the right questions. Taking lots of pics – again having the glass to look through is great.
LikeLike
Dear Jane,
Just read your blog post here about indigo dying. I am having a few toddler-like fits these days. Also, my pH sticks are old but I am told it shouldn’t make a difference as I haven’t had them in the sun or the shade. But I have been ‘under the gun’ with an order for an indigo scarf (of Merino wool) and want to get it finished. My pH reading for the vat is literally “off the map” as it doesn’t have a ‘grid’ for the colours showing up on the pH stick. The vat has a high pH of 12 or so….or perhaps off the map. I ordered new strips arriving tomorrow. Lots of indigo in the vat but don’t want to ruin the lovely Merino wool. Getting to ‘defeat’ on this indigo thing. For now. At least for another day.
Thank you for sharing your process. Most helpful. Ok….’Blue On (carry on)” !!!
LikeLike
Hi Katheen,
Thanks for your message, it can be quite maddening to not get the results that you want! Firstly, I would want to know the range of your pH sticks. Wool and protein fibers need a pH of between 9.5-10, so you’ll need to bring the vat down before proceeding. What kind of indigo vat did you make and what ratios did you use? When did you make it?
I definitely wouldn’t recommend dipping the wool until you know it’s the correct pH, do you have swatches or bits of yarn/fabric to try? I’d give it a little more time before admitting defeat just yet. Let me know how it goes!
Krista
LikeLike
Hello Krista,
Thank you for your reply. I’m now again doing an indigo vat; Michel Garcia’s. 1-2-3 part. Using fructose and builders lime as the recipe asks. I’m preparing to dye more Merino wool (knit) scarves. The pH registers (this time) as 10. So, I’ve added more fructose and waited about 20 minutes before checking the pH again. If the pH is too high, what and how does that impact the wool? I’m guessing that it will be too harsh on the wool fibres and from Michel Garcia’s workshop which was a long time ago, I think he nuanced that in his lesson. Intuitively, it would seem to be harsh on the structure of the wool fibre. I would appreciate your thoughts. I’ve added my second bout of fructose….pH still too high. Thank you!! 🙂
LikeLike
Hi Katheen,
I would guess that if the pH is too high, it wouldn’t properly dye the wool. I did this once and it ended up washing out eventually. What a disappointment! I believe between 9.5-10 is fine for wool, 11 is for cellulose. Definitely try a piece first before the whole scarf.
If the vat is too hot or theres a rapid change in temp with the wool, that may have an effect on the hand. To stay safe, I would have the wool in a bowl of warm water before squeezing out and introducing to the vat (if it’s a warm/hot vat). If it’s a cold vat, no need to think about it. Michel definitely knows more than I do on the subject, so if you remember that, by all means use his lesson. Let me know how it goes!
-K
LikeLike
Thank you Krista. All my wool is soaking in warm water to open the fibres, and awaiting the correct pH 🙂 I will let you know.
LikeLike
Hi Jane,
This is so great and I can feel your one year pain. I’ve been there for sure! I grew my own indigo this year so I’m working from my plant. I got light but very pretty true indigo blues with cellulose but for some reason with protein fibers (different yarns, different scouring batches – fairly apt at this but still I’ve questioned it :)! ) I get either purple-grey or greenish. I think both these might mean PH? I’ve tested the vat showing 10 which is good for cellulose and definitely protein too, yes? I’ve read you can go higher with cellulose but I am dying to get these woolen yarns to work now.
Any ideas? The only thought is maybe I need to let it do a hard reset with time?
Thank you so much in advance. You must have felt triumphant in your success. I know that whoop in your apartment after all that time! 🙂
Sincerely,
Mary
LikeLike
Hi Mary,
Thanks for your message. I haven’t done a lot of Indigo on protein fibers just yet, my first attempt washed out pretty immediately. I’ve read that the pH is different and I’ve thought of making a vat specifically for protein fibers as a result. There are also things to add to help the fiber…I just haven’t got there yet! I know that Kathy Fromm Botanical Colors has some Q&A on fridays on her Instagram, maybe someone has already asked this? Which Indigo vat are you tackling? (Fructose, henna, etc).
I’ve yet to grow enough plants to dye anything as space in brooklyn is limited, so I’m envious of your abilities already! Good luck with all, I’d love to see some photos!
-Krista
LikeLike
Aw, thanks, Krista. I lived in NYC for 10 years, SF and PDX for a year so I definitely understand the lack of growing space living in a city. It’s only now living in upstate NY I have “land”. I’m growing cotton too this year and I’m the city I think I’d have one pot for that 🙂 Good thing there’s extract, right?
Well thank you, that’s so good to know I’m not alone in that struggle and thank you so much for her Instagram account. I’ll definitely be looking that up and mention you!
The vat I made is with sodium hydroxide (roll your eyes, it’s okay). It’s amazing I’d resort to that since I’m very conscious of chemicals but it was on hand surprisingly and it was mentioned in Jenny Deans instruction. I do have henna now so I’m hoping to give that a go. If you’re interested and I get a better understanding with protein, I’ll write you back. Like you, I got silvery purples. Pretty and I’ve been trying to get it with other plants…I was just hoping for blues.
Thank you so much!!! Sincerely,
Mary
LikeLike
Wow, I’m very envious of your upstate NY “land”. I’m sure it’s much more than my two 4’x8′ plots at the community garden! Growing cotton sounds amazing, have you heard of Sally Fox in California? She’s been breeding organic cotton for over 30 years and has beautiful naturally colored varieties.
I’ve actually never tried a vat with chemicals, so no eye rolls here! I’m pretty hard set on natural dyes…though black is the color that will break me. If only I had a river bed full of iron-laden mud to play with. Alas!
I did have a moment to check out your website, your work is lovely! I’m also a bit obsessed with pottery and have been wanting to combine that and weaving for some time now. Definitely keep me in the loop with your indigo quest, I may be trying on some alpaca here in a bit. 🙂
K
LikeLike
Thank you so much for sharing your knowledge! I have been studying with a teacher & using his fermentation vat but setting up my own now & after much research came across your wonderful post. How long have you been using the same vat if you don’t mind me asking & what size stainless steel pot do you use? I have been told conflicting information about how long you can keep the 1.2.3. vat sustained, some saying indefinitely as long as you keep reviving & generally keeping the ph happy, etc. & others saying you will have to toss it down the drain & start over again after about 6 months time. The fermentation vat can be kept alive indefinitely as long as long as it is fed & kept at an optimal temperature so I’m wondering which way I should go. Also, when you are done with the vat for the day, do you do anything special before closing it up & when starting again the following day or days later, do you warm up the entire vat again or is that unnecessary & you can dye with a cold vat? Finally, I was told that you can interchange henna (or madder) with the fructose vat so if you started with the henna vat, you can change it to a fructose vat at some later time if you decided to go that route. Have you had any experience with that? Thanks again so much for your time.
LikeLike
Hi!
Thanks for the message. First things first, my vats usually last around 6 months, mainly because my stainless pot isn’t huge, and when I revive it, more water is added with the henna. Eventually, it gets too close to the top and starts being a little drab in the color department. I probably should maintain it more frequently, but I just don’t dye with indigo every day or week! I’m sure if you were maintaining it properly, it could last “indefinitely.” Also, alot of lime build up on the bottom + small pot might interfere with a larger project, etc. So if you stay on the smaller-scale side of things, it may last longer. When I’m done with the vat for the day, I just turn it off. I’ve read that some people add more of the sugar/henna to replace or balance what was lost, but I haven’t found that right science just yet. I mainly start the vat off correctly and don’t mess with it too much. When I need to re-vamp it, I do equal parts like in the beginning, and my pH stays in the zone, and everything dyes blue. I usually warm it up as it seems to waken it up a bit better than using it cold, then I take a pH reading. I’ve read that the iron indigo vat can be used when cold. I personally haven’t had great luck with fructose and that might be my patience level, but since I’ve met the henna vat, it’s been love at first dip. I haven’t felt the need to explore fructose further, though it’s worked for others I know. I would suggest trying one way and perfecting it as much as you can. Dig into the scientific aspect of it. Once you understand the process, that will translate to other materials and perhaps cross-reducing the vat with anything sugary will work for you. I’m just not there yet!
K
LikeLiked by 1 person
Thanks so much for your response, I am excited to start my own vat! I will most likely start with indigo/madder in a small vat & play around with it until I get the perfect brew going. Happy dyeing! =)
LikeLike
Thanks for sharing the above, I’m going to give this recipe a try! Just one qestion, what type of vessel would be best to use for an natural fermentation vat, any suggestions? I know that stainless is non reactive but I’ve also read lots of suggestions for plant based dyeing to use aluminum as an ‘accidental’ mordant. Or would a large thick plastic barrel be ok (I don’t think I’ll need to heat my vat as I live in subtropical Australia).
Any insight would be soooo greatly appreciated x
LikeLike
Hi Jill,
I use a stainless steel pot for my Indigo vat. When using Indigo, you don’t need to mordant the fibers so an aluminum pot is unneccessary. For other natural dyeing, I’m not sure how much an aluminum pot would affect the color. Since the process already has so many variables (temperature, mineral content of your water source, time of year the natural dyes were harvested), its best to keep close records of your process. I do know that using a copper pot will shift color for natural dyeing, though I still wouldn’t suggest it for Indigo. I’ve seen people use the big plastic barrels and I can tell you from experience that you will need to really know how to balance a vat before investing in materials to fill that. I’ve ruined several vats by not fully understanding the chemistry involved, so I would suggest to start small and work your way up. Good luck!!
LikeLike
Thank you for this. I have failed twice but will not give up! Where can I find the henna and lime? I did an ancient unrine indigo vat and omg the smell is like 2,000 pounds of sauerkraut coming at you. It’s too cold to keep it outside and I just can’t deal with it in my basement any longer lol. I have a lid on the thing but each time I go to check for the coppery film it just stinkkks! And it’s been a week so I thought I’d give it a try and it’s not green. I read it needs to be hotter like 90-100 and We’ll I’m not heating that up in my kitchen haha. I’ll try your method it seems more friendly.
LikeLike
You’re very welcome! I buy henna at my natural food store, but you can buy both of those at Botanical Colors who are based in Seattle and have an online shop. I’ve wondered about a urine vat though I feel I’d have to live in the woods, away from discerning eyes (and noses)! When I use henna, the “water” solution under the top is a reddish brown color, so it might be different depending on the ingredients used. Definitely try a less smelly natural vat, it’s pretty earthy but not quite as pungent as sauerkraut. Also, I just heat up enough that’s it’s comfortable putting my hands in with gloves. Good luck!!
LikeLike
Thanks for sharing! It’s my turn to give it a patient try tomorrow. Cross fingers!
LikeLike
You’re welcome! Let me know how it goes!!
LikeLike
Success! Success!
I did the fructose version of the vat with 10 grams of indigo. I did 4 dips with 150 grams of wool and 3 dips with an antique linen napkin. The pretty middle blue seems to be wash fast.There is still a lot of undissolved pigment at the bottom of the pot, so I will try to restart the vat again tomorrow.
LikeLike
Fantastic, you’re a natural!!
LikeLiked by 1 person